Table of Contents
Combined Flow and Deflection Measurements of FSI-Induced Oscillation of Two Rigid Structures in Turbulent Flows
Experiments by Pereira Gomes and Lienhart
Description
Characterisation of the FSI-induced two-dimensional limit-cycle oscillation (LCO) of two rigid structures in pure rotation in uniform flows. The measurements were performed in water at a constant flow velocity of 1.07 m/s.
The complete description of the present set of experiments is available as a PDF file: c_data_description.pdf.
Geometrical parameters
Model definition
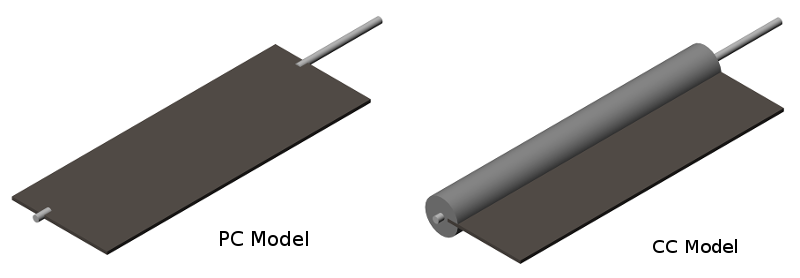
The structure models are presented in figure 1. The first model consisted of a simple 2 mm thick carbon-reinforced fiber flat plate. The second model consisted of a front 22 mm diameter aluminium circular cylinder with an attached flat plate. For simplicity, the same kind of plate was used for this model, i.e., a 2 mm carbon-reinforced fiber plate. The overall length of the models was defined as 64 mm and the spanwise dimension was chosen to be equal to the spanwise dimension of the test section, to guarantee the two-dimensionality of the experiments. Just a small gap of 1.5 mm between the models and the walls of the test section was set in order to avoid any possible friction between the moving models and the walls.
 Fig. 1: Rigid structure models
The geometric definition of the models is presented in figure 2. The table below summarizes the mechanical and dynamic properties of these models.
| Property | PC model | CC model |
|---|---|---|
| \(\rho_{front body}\) [kg/m3] | - | \(2828\) |
| \(\rho_{flat plate}\) [kg/m3] | \(1475\) | \(1475\) |
| \(m\) [g] | \(33.4\) | \(208.9\) |
| \(I_0\) [kg m2] | \(1.62\times 10^{-5}\) | \(3.70\times 10^{-5}\) |
| \(x_{CM}\) [mm] | \(12.00\) | \(3.49\) |
| \(f_0\) [Hz] | \(2.48\) | \(2.21\) |
 Fig. 2: Geometry of the rigid structure models (dimensions in mm)
Flow domain definition
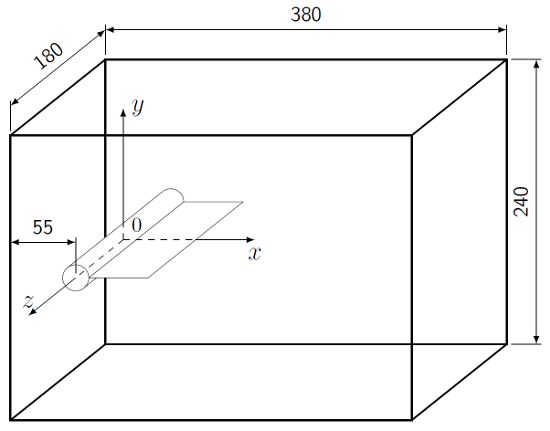
The measurements were conducted in a vertical, closed-loop water tunnel. The spatial dimensions of the tunnel test section are shown in figure 3. It had a 180 mm x 240 mm cross-sectional area and a total length of 380 mm. As a direct consequence of the vertical orientation of the tunnel, the gravity force was aligned with the flow (\(x\) axis, see figure 3). In this way, the gravity force did not introduce any asymmetry in the experiments. All test models were mounted 55 mm downstream of the inlet plane of the test section with a free rotational degree-of-freedom. The supporting system used two low friction bearings and was designed to guarantee frictionless rotation of the model around the \(z\) axis (see figure 3).
Flow parameters
The fluid properties for the two test cases were identical and are summarized in the table below. Within the temperature range of the tests, the kinematic viscosity and density of the fluid were measured to be constant.
| Test case | \(U_{\infty}\) [m/s] | \(Re\) [-] | \(\nu\) [m2/s] | \(\rho\) [kg/m3] |
|---|---|---|---|---|
| PC1 | 1.07 | 70600(a) | \(0.97\times 10^{-6}\) | 998 |
| CC1 | 1.07 | 24300(b) | \(0.97\times 10^{-6}\) | 998 |
| (a) based on the overall length of the model. (b) based on the diameter of the front body of the model. |
||||
The inlet velocity condition was characterized in the absence of any model at the location \(x = -55\) mm in the centre plane of the test section (\(z=0\) mm, see figure 3). The flow angularity was measured to be less than 0.5o and the RMS value associated with the fluctuation of the magnitude of the velocity less that 1%. These values, and also the mean flow velocity of \(U_{\infty}=10.7\) (m/s), corresponded to values measured over the interval -85 mm \(\le y \le\) 85 mm. The inlet velocity profile for the test cases is available in c1_inlet_velocity_profile.dat.
Experimental details
Flow field measurements
The flow velocity field was measured using a DANTEC two-dimensional, two-component particle image velocimetry (PIV) system. For the acquisition of the images, two synchronized 1280 pixel x 1024 pixel CCD cameras equipped with 60 mm focal length macro lenses were adopted to acquire two simultaneous and adjacent time-dependent pairs of images from the centre plane of the test section (\(x-y\) plane, see figure figure 3). The PIV images acquired by the two cameras were then imported into a MatLab-based post-processing script to stitch the corresponding pairs of images before being correlated. Opting for this solution, it was possible to achieve an extended 270 mm x 170 mm flow field measuring area while keeping the spatial resolution of the measurements as high as 7.53 CCD pixel/mm.
For the illumination of the flow, two laser light sources were used from both sides of the test section, each to illuminate the flow at each side of the model, and, therefore, to avoid any shadow region in the flow. The lasers were of the double-head pulsed Nd:YAG type and delivered light pulses of a wavelength of 532 nm with a maximum energy of 120 mJ.
As seeding particles, 10 \(\mu\)m mean diameter hollow glass spheres were chosen.
Reconstruction of the measurements in the time-phase space
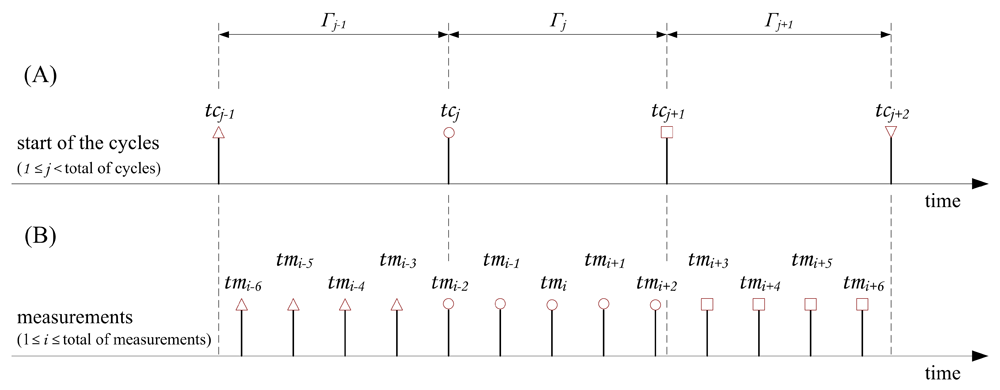
The measuring system was operated at constant acquisition rate and the reconstruction of the measurements in the time-phase space was performed during the post-processing period. This approach was chosen instead of triggering the data acquisition by the experiment in order to couple with the usual cycle-to-cycle fluctuation of the structure oscillating period found in free oscillation tests. figure 4 shows a typical data reconstruction using this method. Simultaneously with the acquisition of the measurements, two kind of events, the acquisition of the measurements \(tm_i\) [figure 4(B)] and the beginning of the movement cycles \(tc_j\) [figure 4(A)], were recorded. These time events were detected using the camera trigger signal and the signal of an angular position sensor located in the rotating axle of the structure, respectively.

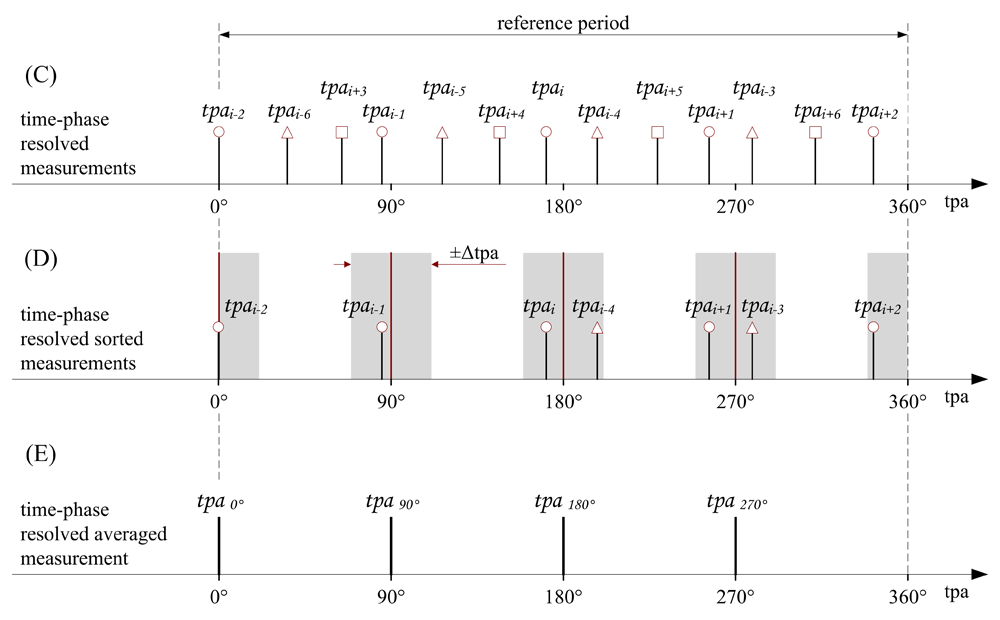
 Fig. 4: Time-phase resolved measurements reconstruction scheme
The event monitoring was performed by an hardware module designed based on a field programmable gate array (FPGA) and a 1 MHz internal clock. It was capable of recording up to 250 events per second with an accuracy of 2 \(\mu\)s.
From the recorded events time information, a post-processing software computed the time-phase angle \(\phi\) for each acquired measurement. At this point, the resolved measured data could be reorganized in a reference period equal to the mean period of all acquired cycles [figure 4(C)] to be sorted out according to a predefined time-phase angle resolution and uncertainty [figure 4(D)]. Finally, the data falling within one time-phase angle slot were averaged to obtain the final result [figure 4(E)]. In the present test cases, the reconstruction of the experimental results was performed with a time-phase resolution and uncertainty of 5o and 0.5o, respectively, and the final result corresponded to the mean value of 100 realizations.
Available Data
Data available consists of:
- Time-phase traces of the angle of the models through each of their oscillation periods (together with the measured oscillation frequency)
- Maps across the middle plane of the experimental domain (\(z=0\)) of the mean \(U\) and \(V\) velocities at \(5^o\) intervals through the oscillation cycle for each model
Sample plots of selected quantities are available.
The data files can be downloaded as compressed archives, or individually from the tables below.
| Inlet velocity profile, at \(x=-55\) mm | c1_inlet_velocity_profile.dat |
The files below give the time-phase trace of the angle of the model (\(\theta\)) within an oscillation period, together with the frequency of the limit cycle oscillation of each model.
| Test case | Oscillation Frequency | Time-phase trace data |
|---|---|---|
| PC1 | 2.49 Hz +/- 1.8% | pc1_structure_angle.dat |
| CC1 | 5.08 Hz +/- 1.3% | cc1_structure_angle.dat |
The files below contain the phase-resolved data on the mean flow field for both model cases. Each file contains data over the \(z=0\) plane for the given phase angle.
Finally, one should take into account that the results obtained with the PC model were affected by the supporting system of the structure. In this case, the structure was not large enough to overlap the image of the bearing holder and therefore the part of the flow field corresponding to a 13 mm diameter circle around the origin was not accessible by optical means.
References
- Gomes, J.P. (2011), Fluid-structure interaction-induced oscillation of flexible structures in uniform flows, Ph.D. Thesis, Erlangen.
- Gomes, J.P., Lienhart, H. (2009), Experimental Benchmark: Self-excited Fluid-structure Interaction Test Cases, in Fluid-Structure Interaction II: Modelling, Simulation, Optimisation, (ed. Bungartz, H.J., Mehl, M., Schäfer, M.), Springer-Verlag.
Acknowledgements
The authors gratefully acknowledge the financial support for their research work through the German Science Foundation (DFG), Germany, and Fundação para Ciência e Tecnologia (FCT), Portugal. In addition, the authors acknowledge the funding of the Erlangen Graduate School in Advanced Optical Technologies (SAOT) by DFG in the framework of the German excellence initiative.
Indexed data:
| case087 (dbcase, flow_around_body) | |
|---|---|
| case | 087 |
| title | Flow and deflection measurements of FSI-induced oscillation of two rigid structures in turbulent flows |
| author | Pereira Gomes, Lienhart |
| year | 2011 |
| type | EXP |
| flow_tag | 2d, unsteady, separated, fsi, bluff_body |
